-
Day10교육/서울 ICT 이노베이션 고오급 시각과정 2021. 6. 17. 12:34728x90
왜곡보정
렌즈 왜곡 : 렌즈의 품질이 좋지 않아서 발생

렌즈 왜곡 예시 체스보드를 이용해서 왜곡을 보정
체스보드를 다양한 위치, 각도로 촬영하고 촬영된 체스보드 영상을 보정알고리즘에 넣어 보정하는 방법

렌즈 왜곡 보정 방법 위의 식에서 k,r,p같은 파라미터를 구해야함
파라미터를 구하기 위해 여러 샘플 체스보드의 x,y좌표를 넣어서 연립방정식을 푸는 것
이 때 체스보드의 위치를 알려주지는 않고 체스보드의 좌표들이 하나의 평면위에 있다는 사실+체스보드 칸 간격만을 알려줌
//opencv내부에 체스보드 샘플이미지가 있음 left01~left14, right0~right14 두 개 다 쓰면 3d
//10이 없으니까 14를 10으로 변경해서 01~13까지로 만들어서 사용할 것
#include<stdio.h>
#include<opencv2/opencv.hpp>

using namespace std;
using namespace cv;

int calibration() {
	Size boardSize(9, 6);	//체스보드의 칸이 9(가로칸꼭지점개수)*6(세로칸꼭지점개수), 최소 5*5이상은 해야 성능이 잘 나옴
	float squareSize = 1;	//체스보드 한 칸의 크기
	vector<Point3f> objectPointSeed;
	for (int i=0;i<boardSize.height;++i){
		for (int j = 0; i < boardSize.width; ++j) {
			//체스보드의 좌표가 현실좌표계에서 어디인지 적어주는 것
			//(Point3f(x좌표,y좌표,z좌표) 평면이니까 z좌표는 0
			objectPointSeed.push_back(Point3f(float(j * squareSize), float(i * squareSize), 0));
		}
	}

	//이미지 불러오기
	vector<Mat> images;
	for (int i = 0; i < 14; i++) {
		String filename = format("images/left%.2d.jpg", i);
		Mat image = imread(filename);
		images.push_back(image);
	}

	//13개의 이미지의 좌표들 입력
	vector<vector<Point3f>> objectPoints;
	vector<Mat> imagePoints;
	//13개의 이미지를 하나씩 탐색
	for (const auto& image : images) {
		Mat corners;
		//findChessboardCorners()를 통해 카메라로 찍힌 좌표를 구함
		bool found = findChessboardCorners(image, boardSize, corners);
		Mat gray;
		cvtColor(image, gray, COLOR_BGR2GRAY);
		//cornerSubPix() 코너점을 정밀하게 보정
		cornerSubPix(gray, corners, Size(5, 5), Size(-1, -1),
			TermCriteria(TermCriteria::EPS + TermCriteria::MAX_ITER, 30, -.1));
		drawChessboardCorners(image, boardSize, corners, found);

		imagePoints.push_back(corners);
		objectPoints.push_back(objectPointSeed);
	}


	Size imageSize = images[0].size();
	//outputs
	//cameraMatrix:카메라초점거리,카메라 중심이동유무, distCoeffs:왜곡파라미터,
	//카메라 위치들 rvecs:rotation vectors, tvecs:transpose vectors
	Mat cameraMatrix, distCoeffs, rvecs, tvecs;
	//매개변수찾아주는 함수
	calibrateCamera(objectPoints, imagePoints, imageSize, cameraMatrix, distCoeffs, rvecs, tvecs);
	//새로운 카메라 matrix를 구해줌, 왜곡이 없는 카메라 위치를 찾아줌
	Mat newCameraMatrix = getOptimalNewCameraMatrix(cameraMatrix, distCoeffs, imageSize, 1, imageSize, 0);
	Mat map1, map2;	//보정하는 것에 대한 lookup table
	//왜곡 제거 matrix계산, 왜곡제거한 이미지를 계산해줌
	initUndistortRectifyMap(cameraMatrix, distCoeffs, Mat(), newCameraMatrix, imageSize, CV_16SC2, map1, map2);

	for (const auto image : images) {
		Mat rec;
		remap(image, rec, map1, map2, INTER_LINEAR);
		imshow("image", image);
		imshow("rec", rec);
		waitKey(0);
	}
	return 0;
}

void main() {
	calibration();
}
objectPointSeed()에서 말하는 현실좌표계(=체스보드 왼쪽위가 원점) 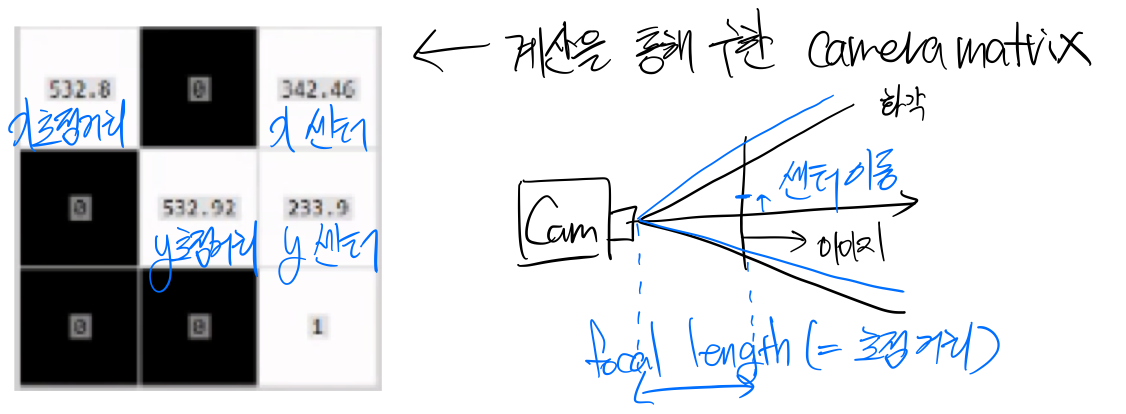
camera matrix 이진화와 모폴로지
1. 영상의 이진화
1. 영상의 이진화
밝기값을 모두 조사해서 특정값 이상이면 밝게 이하면 어둡게 하는 게 영상의 이진화
하지만 밝기값이 불균일한 영상이면 임계값을 정하기 힘듦 그래서 나온 게 적응형 이진화!
2. 적응형 이진화
주변의 밝기값을 평균을 내서 임계값으로 설정
주변을 얼마나 조사할 지의 범위(블록)를 잘 정해줘야함
2. 모폴로지 연산
이진 영상의 침식(min)과 팽창(max)
타겟 픽셀의 주변으로 마스크를 씌우고 마스크 내의 최소값으로 대체하면 침식, 최대값으로 대체하면 팽창
모폴로지 연산은 언제 쓰는감?
영상에 잡음이 있을때 침식하고 팽창하면 잡음제거됨
확장하면 중간에 구멍있던게 사라짐
void ch11_1()
{
	Mat src = imread("images/sudoku.png", IMREAD_GRAYSCALE);
	Mat max;
	Mat min;
	//확장 src:입력영상/max:확장된 결과영상/ones:원형필터/Point:필터의 중심좌표/5:반복횟수
	dilate(src, max, Mat::ones(3, 3, CV_8U), Point(1, 1), 5);
	//침식
	erode(src, min, Mat::ones(3, 3, CV_8U), Point(1, 1), 5);
	Mat back;
	//확장했다가 침식한 결과
	erode(max, back, Mat::ones(3, 3, CV_8U), Point(1, 1), 5);

	//bottom-hat : 확장했다가 침식한 것(연립연산)-원본영상
	//일정한 크기나 선을 가진 걸 추출할 때 유용 ex)번호판인식
	Mat fore = back - src;
	imshow("src", src);
	imshow("max", max);
	imshow("min", min);
	imshow("back", back);
	imshow("fore", fore);
	waitKey(0);
}


원본/침식/팽창 
팽창->침식 
팽창->침식 - 원본 //적응형 이진화의 맹점 : 주변 밝기 조사할 때 주변이 다 똑같은 색이면 임계값도 같은 값으로 적용되어 전부 흰색으로 표현 //->큰 필터를 적용하면 되는데 그럼 연산량도 증가됨->이미지크기를 줄이는 방법도 있음 void ch11_2() { Mat src = imread("images/qrcode.jpg"); Mat gray; cvtColor(src, gray, COLOR_BGR2GRAY); imshow("gray", gray); double rate = 1; for (int i = 0; i < 10; i++) { Mat resized, bin; resize(gray, resized, Size(), rate, rate); adaptiveThreshold(resized, bin, 255, ADAPTIVE_THRESH_MEAN_C, THRESH_BINARY, 9, 20); imshow("bin", bin); waitKey(0); rate *= 0.9; //영상축소비율 } }

원본 

적응형 이진화 
개선 레이블링과 외곽선 검출
1. 레이블링
void qrcode_detector()
{
    Mat src = imread("images/qrcode.jpg");
    Mat gray;
    cvtColor(src, gray, COLOR_BGR2GRAY);
    Mat bin;
    //이미지 이진화
    threshold(gray, bin, 128, 255, THRESH_BINARY);
    //Canny(gray, bin, 50, 200);	혹시나 너무 어둡거나 그늘진데서 썼을때 캐니를 쓰면 됨
    imshow("bin", bin);
    waitKey(0);

    //vector<vector<Point>> : 리스트의 리스트의 포인터
    //하나의 외곽선 : 포인터들의 집합->리스트의 포인터
    //외곽선은 여러개 존재->리스트의 리스트의 포인터
    vector<vector<Point>> contours;
    vector<Vec4i> hierarchy;	//칸투어들의 구조화된 정보
    //외곽선 검출
    //외곽선은 닫힌 구조로 외곽선 안에 외곽선 안에 외곽선,,,->트리 구조로 나타낼 수 있음 : hierarchy
    //트리구조할지말지 : RETR_TREE
    //CHAIN_APPROX_NONE : 외곽선을 추출할 때 최적화할수있는 알고리즘
    findContours(bin, contours, hierarchy, RETR_TREE, CHAIN_APPORX_NONE, Point(0, 0));

    //모든 칸투어 그리기
    Mat dst = Mat::zeros(gray.size(), CV_8UC3);	//칸투어를 그릴 빈 캔버스
    for (int i = 0; i < contours.size(); i++)
    {
        //칸투어를 단순화시키는 함수
        vector<Point>app;
        //arcLength():외곽선길이출력
        //외곽선의 2%를 thresold로 준다->외곽선의 점을 찍는 걸 50개 밑으로
        //2~50개 안으로
        int thres = max((int)(arcLength(contours[i], true) * 0.02), 2);
        approxPolyDP(contours[i], app, thres, true);	//Ramer-Douglass-Peucker알고리즘
        contours[i] = app;
        Scalar c(rand() % 160, rand90 % 160, rand() % 160);	//랜덤한 rgb값(그릴 칸투어의 색깔)
        drawContours(dst, contours, i, c, 2);	//i번째 칸투어를 찾아서 그려줌
    }
    imshow("dst", dst);
    waitKey(0);

    //사각형만 그리기
    for (int i = 0; i < contours.size(); i++)
    {
        auto& con = contours[i];
        if (con.size() == 4)
        {
            drawContours(dst, contours, i, Scalar(255, 255, 255), 2);
        }
    }
    imshow("dst", dst);
    waitKey(0);

    //부모와 자신, 자녀 모두 사각형인 도형만 그리기
    for (int i = 0; i < contours.size(); i++)
    {
        auto& con = contours[i];
        Vec4i& hie = hierarchy[i];
        int a = hie[3];
        if (hie[3] == -1 || hie[2] == -1) continue;
        auto& parent = contours[hie[3]];
        auto& child = contours[hie[2]];

        if (parent.size() == 4 && child.size() == 4 && con.size() == 4) {
            /*double parentLen = arcLength(parent, true);
            double conLen = arcLength(con, true);
            double childLne = arcLength(child, true);
            printf("%lf %lf \n", parentLen/conLen, conLen/childLen);*/
            drawContours(dst, contours, i, Scalar(0, 255, 255), 2);
        }
    }
}
2. 외곽선 검출